Wikidata Integrator is a Python library that simplifies data integration from Wikidata (and other Wikibases). It is written in Python, is focused on Wikibase concepts (as opposed to some libraries which are MediaWiki focused) and has a user-friendly interface.
I’m currently working on a demo Wikibase and decided to bring all of the data into the Wikibase making use of a Jupyter notebook, and Wikidata integrator was my choice library to use for this task. (Jupyter notebooks are interactive coding environments that allow users to create and share documents containing live code, visualizations, and explanations.)
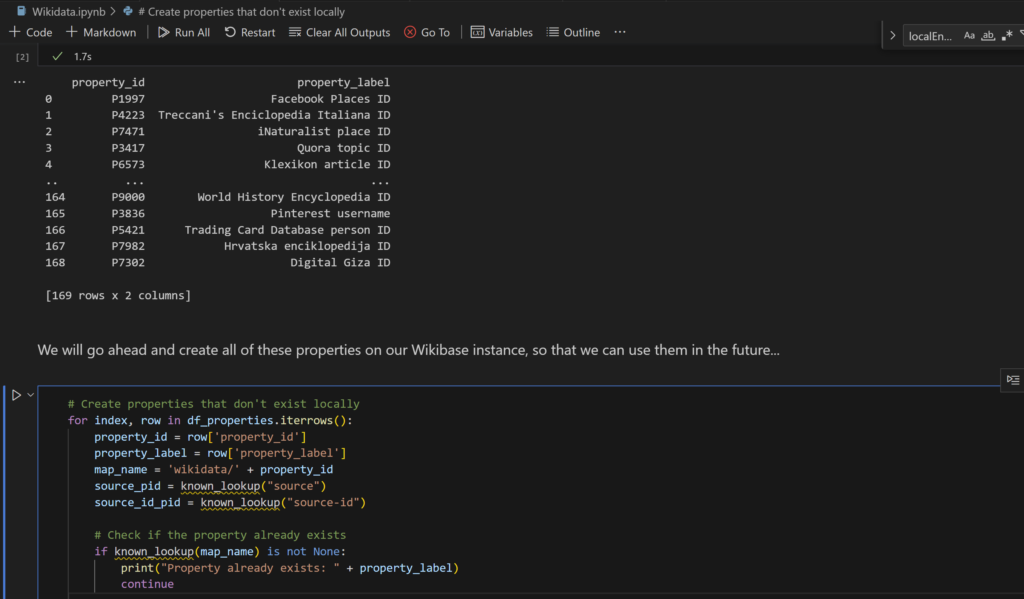
Along that journey I found the Wikidata Integrator documentation lacking slightly, but I managed to get initial property and item creation working with little effort. However, I couldn’t get properties to create with statements already on them (needed a subsequent edit instead).
Over the years I have created a few little side projects, as well as working on other folks’ Wikibases, and of course Wikidata. And the one thing that I still wish would work better out of the box is reconciliation.
What is reconciliation
In the context of Wikibase, reconciliation refers to the process of matching or aligning external data sources with items in a Wikibase instance. It involves comparing the data from external sources with the existing data in Wikibase to identify potential matches or associations.
The reconciliation process typically follows these steps:
Data Source Identification: Identify and select the external data sources that you want to reconcile with your Wikibase instance. These sources can include databases, spreadsheets, APIs, or other structured datasets.
Data Comparison: Compare the data from the external sources with the existing data in your Wikibase. This step involves matching the relevant attributes or properties of the external data with the corresponding properties in Wikibase.
Record Matching: Determine the level of similarity or matching criteria to identify potential matches between the external data and items in Wikibase. This can include exact matches, fuzzy matching, or other techniques based on specific properties or identifiers.
Reconciliation Workflow: Develop a workflow or set of rules to reconcile the identified potential matches. This may involve manual review and confirmation or automated processes to validate the matches based on predefined criteria.
Data Integration: Once the matches are confirmed, integrate the reconciled data from the external sources into your Wikibase instance. This may include creating new items, updating existing items, or adding additional statements or qualifiers to enrich the data.
Reconciliation plays a crucial role in data integration, data quality enhancement, and ensuring consistency between external data sources and the data stored in Wikibase. It enables users to leverage external data while maintaining control over data accuracy, completeness, and alignment with their knowledge base.
Existing reconciliation
One of my favourite places to reconcile data for Wikidata is by using OpenRefine. I have two previous posts looking at my first time using it, and a follow-up, both of which take a look at the reconciliation interface (You can also read the docs).
As a WordPress user or reader, you might have noticed that some blogs and websites use a “More” block to break up their content and display a teaser of the post on the homepage or archive pages. This feature allows visitors to see a preview of the post and decide if they want to read more.
Personally, I enjoy adding “More” blocks to my posts, so that people that subscribe to email updates about blog posts, still have to visit the site to view the whole content. This helps me track actual interest in the posts, as they get page views.
In this blog post, we’ll explore how you can require a “More” block in your WordPress posts to improve user experience and engage your audience. 😊
As a developer, one of the most critical aspects of your workflow is the ability to test and preview your code changes before deploying them to production. This is where developer previews come in.
This post will outline how to create your own simple developer preview system, using Github Actions for building, AWS S3 for hosting, and Terraform to provision it all. Giving you more control, and a lower cost.
Shout out to Pedro Brandão from Significa whose post I read as inspiration for this setup.
What are Developer Previews?
Developer previews, also known as feature branches or pull request previews, allow developers to create isolated environments to test their changes without impacting the main production environment. It enables teams to collaborate, review, and validate code before merging it into the main branch. With developer previews, you can catch bugs, validate new features, and gather feedback early in the development process, ensuring a smoother deployment to production.
Existing services
Many dedicated platforms exist that offer developer preview as a service. These platforms provide a streamlined solution for creating and managing isolated environments for testing code changes. Examples of such services include Netlify’s Deploy Previews, Vercel’s Preview Deployments, and Heroku Review Apps. These platforms integrate seamlessly with popular version control systems and automatically deploy feature branches or pull requests, allowing developers to easily preview their changes. By leveraging these dev-preview services, developers can simplify the process of creating and managing preview environments, enabling faster iteration and effective collaboration within development teams.
However, all these services have a cost, which will always be higher than the do-it-yourself approach.
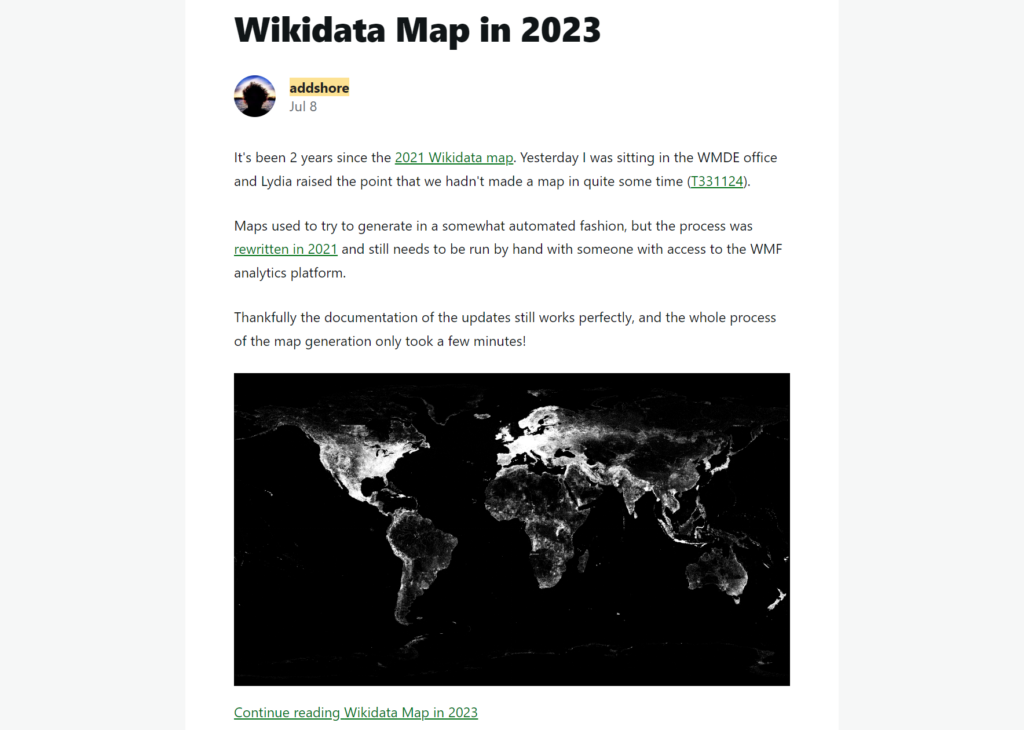
This entry is part 15 of 17 in the series Wikidata Map
It’s been 2 years since the 2021 Wikidata map. Yesterday I was sitting in the WMDE office and Lydia raised the point that we hadn’t made a map in quite some time (T331124).
Maps used to try to generate in a somewhat automated fashion, but the process was rewritten in 2021 and still needs to be run by hand with someone with access to the WMF analytics platform.
Thankfully the documentation of the updates still works perfectly, and the whole process of the map generation only took a few minutes!
I briefly touched on my OpenSSH agent to WSL2 solution back in 2021. Today find myself setting up a new Windows 11 laptop and running into a couple of different issues, and ultimately using a slightly different solution than before, so here is the short writeup glossing over the areas that lead me to get a little stuck, and hopefully outlining a good set of commands.
In my old .bashrc file, I found a comment linking me to the rupor-github/wsl-ssh-agent GitHub repository which was my first set of reading, specifically the WSL2 compatibility section. The main sticking issue for me out of the box was a miss match in the OpenSSH version between Windows and WSL2, with Windows starting on 8.6 but WSL2 with Ubuntu starting on 8.9. This lead to errors such as:
Error connecting to agent: No such file or directory
error fetching identities: invalid format
Could not open a connection to your authentication agent.